By Tony K
There are some good reasons to install dual batteries and if you drive a Toyota diesel it is somewhat mandatory. Diesels tend to take a bit more effort to turn over that high compression. But just about any rig will benefit from the extra juice supplied by a second battery. There are numerous ways to connect a dual battery set up but like I have said before I like simple.
If you run a lot of high draw accessories the second battery will make sure you have the power to keep going or even start the rig after some prolonged battery usage. The extra battery allows me to leave my fridge running overnight when camping and my rig never hesitates to start at the end of a trail run when my compressor sees a lot of heavy continuous use airing up tires.
 -Battery Install-
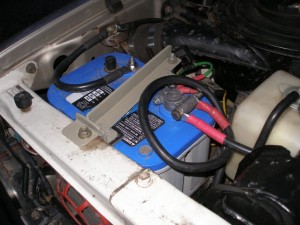
One of the great things about the 60 series is that it is very easy to add a second battery under the hood. If you don’t want to fab something up, original battery mounts are available for both sides of the engine. And the factory mounts even have a place to connect the displaced overflow bottle for the radiator. But being the fabricator I am I made my own mounts, including one to replace the original rusted out trays in my BJ60. The photo is the passenger side and the drivers side is pretty much a mirror image.
-A Basic Set Up-
The easiest way to run the second battery is to just connect it in parallel. What this means is connecting the positive terminals to each other and both negatives to ground. Toyota did it this way for diesels with 12V systems from the factory. No fancy switches or electronics just a few cables to connect them. Alternator just thinks there is one big battery so it can’t get simpler than this.
-Manual Battery Controls-
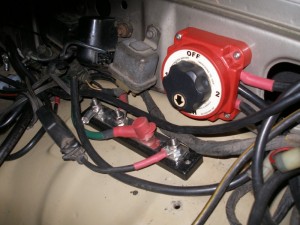
While I like simple I also like the ability to control just whats going on with my electrical system. I found the easiest way to do this is with a Marine Battery Switch from Blue Seas. This switch has four positions, off, battery 1, battery 2 or use both batteries. The electricians I work with tell me it is a “make or brake switch”, meaning you can move between 1,2 or Both with the engine running with no ill effects. But do not go to the “off” position with the engine running as bad things may happen…
-Using the system-
The system is still set up with the batteries wired in parallel but instead of connecting them directly to each other the wires first go through the switch. The added benefit of this is the ability to isolate the batteries during use, such as winching and even jump-starting. And in the off position, maintenance to anything on my rig can be done without risk to an electrical component. No removing cables just turn a switch.
 And having the switch allows me to isolate the batteries while the rig is still running. This is done with the switch as well as some additional battery cables. Rather than run everything to the same power source or directly to the switch certain components are wired direct to individual batteries. My front winch is wired to battery 2, passenger side and my jump-start connection is wired to battery 1 on the drivers side. Everything else is wired to a buss bar that is powered by whichever position the battery switch is in. Flipping the switch to 1 or 2 will remove the other side from the alternator and the active system. This is really important when jump-starting another rig as it is safer to isolate the battery doing the jumping and having the switch ensures I can do this safely while leaving my rig running.
-Other things to think about-
Being that this is a very simple set up you have to keep an eye on maintenance. There is nothing to tell you the condition of the batteries so occasional checks with a meter are important. Catching a weak battery will prevent you from killing off the good one. Yes this happened to me a few years ago. Because the batteries are connected when using the system set to “both” one weak battery will drag the other down. I recently installed a voltmeter connected to both batteries with a momentary switch that allows me to check the voltage of an individual battery. And this thing is wired so I can check the voltage without the key in the ignition. Makes things easy when I am sitting in camp. And once I let go of the switch the voltmeter is no longer connected to the system.
Don’t mix start and deep cycle batteries. These two types of batteries function very differently and while it can be done with isolators or other electronics we circle back to the keep it simple principle that I tend to live by. And there are some possible hazards involved with mixing battery types, possibly burning up an alternator being the worst. For a detailed explanation of why it’s not a good idea go to this link www.batteryfaq.org This guy has probably forgotten more about batteries than I have learned. Mixing start and deep cycle batteries is covered in section 7.1.9
For me though there is an additional reason to not mix battery types, I also have the ability to switch my wiring from a 12V parallel to a 24V series set up to run my Ready Welder. And to make this the most efficient I need to run two deep cycle batteries wired in series.
With a parallel set up you are creating a larger battery by hooking two batteries together without changing the voltage. Series means connecting two batteries together but changing the voltage. Two 12V batteries wired in series will produce 24 volts. This is done by grounding the neg terminal of the first battery, then connecting the positive post of the first battery to the negative terminal of the second. Now you will get combined voltage of both batteries off the second batteries positive terminal.
If you want to see how I do this in my rig go to the Ready Welder Wiring Job write up here on the site. There you will find a detailed how to explanation. And just like my battery set up this is done with switches rather than disconnecting cables. The only time I actually have to disconnect cables is when switching from positive to negative polarity when doing different types of welding.
-Battery of Choice-
For several reasons I use Optima Blue Top Batteries. Some of them are relevant to the electrical system and some are more important to how I use my rig. Do some research to find out what is best for how you plan to use the rig, but these have worked out great for me. The model I use is a D34M. This battery is considered a dual purpose model that has 750CCA and an RC rating of 120. This battery will take a lot of abuse and has a lot of power in a fairly compact package. With batteries, bigger is generally better but there is only so much weight I want to carry so my batteries are a good compromise.
-Wire Selection-
While buying the correct length of cables can be a pain there is an easier way. I bought marine grade battery cable (wire is tinned copper) and used the crimp tools from work to attach tinned copper lugs. All ends are covered with heat shrink, leaving a minimal amount of lug showing. I pretty much stuck with 2 gauge wire for all the main battery connections with a bit of 4 gauge thrown in for the welder and the power lead to my rear winch. These sizes are plenty adequate for the loads I will put on them.

