By Tony K
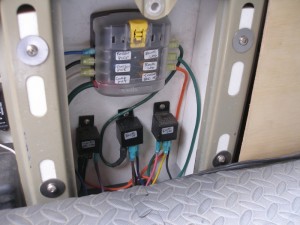
When I added extra circuits to my 62 I just tended to put them where ever they fit, something I vowed not to do on my BJ. And when it came time to wire the BJ, first and foremost was the need for additional fused circuits. I found the easiest way to do this was by using Blue Seas fuse boxes. The ones I used have 6 circuits each. I put one in the rear quarter panel and one under my console. The one in the back provides power to the Fridge, air compressor, rock lights, back up lights on the rig and trailer and a charge wire to the trailer plug. The one attached to the bottom of the console holds circuits  for my GPS, DC outlets and numerous lighted switches that require fuses.
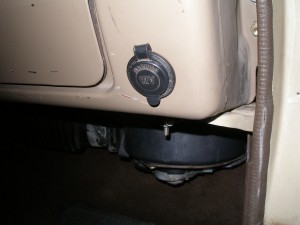
Now that I had circuits for them I could add DC outlets where I needed them. I put one in the dash on the passenger side. This way the spouse gets her own to charge the camera battery, phone or whatever and I can’t be accused of using it for something else. 3 more were placed in the console, one for my GPS, one for a AA battery charger and one to run the kids stuff in the back seat.. There is also one in the back to provide power to the fridge.
I used to have one under the hood of my 62 but I never used it so I didn’t keep it when I did the BJ. And I also eliminated the second one in the back because that one was never used either. All of the outlets I added are made by Marinco. I like them because they have an integral cover and the matching plug will lock into them so it doesn’t fall out .
The one smart thing I did for all these outlets is to wire them so they are hot all the time. None of them turn off with the key. That way I can’t accidentally kill power to the fridge, GPS or other accessories. Yes you can inadvertently leave power on but I prefer it this way.
I placed all the grounds for these fuse boxes on nearby terminal strips that were grounded to the body or the frame. This kept things cleaner than running all the grounds back to the fuse box. But if you prefer, fuse boxes with grounds are available.
-More About Grounds-
For the amount of power I have hooked to my rear aux fuse panel I would hesitate to trust a small sheetmetal ground. While all the sheetmetal is technically speaking a ground, would you trust a winch grounded to the sheetmetal? On the otherhand, the forward aux fuse panel I installed under the console has a much lighter load on it so that one is just grounded to the body with a solid connection. I didn’t feel so bad about not hooking this one to the frame because the ground wire on the t-case attaches to the underside of the body really close to this one.
If you are going to ground an auxiliary fuse panel, run a proper ground to the frame. Any ground to the sheetmetal eventually finds its way to the frame anyway. And in the back of our wagons there is no large ground wire to the frame. All the sheetmetal grounds have to travel through the main battery ground (which was hooked to the sheetmetal right next to the battery at the factory) to get to the frame by way of the engine block then the ground from the starter that is hooked to the frame.
The electricians at the boatyard I work at tell me that the ground wire should be equal in size to the supply wire. While body grounds work just fine for fairly small individual components there is no way I am going to hook a 6 gauge or larger ground wire (sufficient for an aux fuse panel) to the sheetmetal. Depending on what you plan to connect to a fuse panel there is the potential for a large draw on the system needing an equally strong ground connection.
For small individual components, go ahead and ground them to the sheetmetal but it can’t hurt to add a solid ground to the frame for aux fuse panels or large draw items especially at the back of the rig.

