By Tony K
 And just why is this diaphragm so important? Believe it or not (and some of the diesel mechs I work with are still amazed) there is no mechanical connection to the throttle on our 3B’s. Acceleration is controlled by vacuum pressure through this diaphragm. On most diesels the throttle actually moves the rack inside the injection pump, on our 3B’s the pedal just moves the butterfly in the intake which controls how much vacuum is applied to the injection pump which in turn moves the rack in the pump and hence, acceleration.
I can’t say there was anything drastically wrong with mine but since I had things apart for a head gasket replacement I decided to change out the diaphram in the injection pump. That and god only knows how old it was or the exact condition.
Disassembly Time
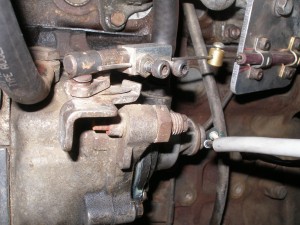
Pulling the screws on the housing gave me an indication that changing it was a good idea. While there is a drain fitting for oil that makes it into the pump side of the housing, no such fitting exists on the outboard side (or aft side if you are looking at the pump) and on mine it needed one. The outer housing was almost 1/3 full of motor oil. How it got in there is a guess as there is no direct oil access and the pump seemed to be working reasonably well. A hole in the leather of the diaphragm itself should have shown it’s ugly head with poor performance. And according to the factory manual no oil grease or sealant should be in contact with the leather.
Once you pull it off be careful with the loose spring and especially with the shims that are installed underneath the spring as these were selected by someone when the injection pump was set up originally or after maintenance with equipment that you and I are not likely to have.
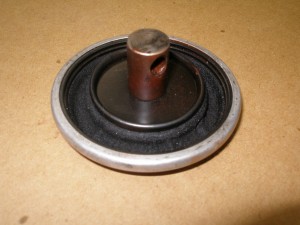
One other thing on mine is that the washer and cotter key that secures the diaphragm to the stud (that is bolted through the rack lever) were mostly missing in action. The washer was completely missing and the cotter key was only a remnant of it’s original self. It was just a bent piece of metal dropped through the hole, how it just didn’t vibrate off is beyond me. A thorough search of the housing with a magnet ensured that no loose pieces were still around.
 A quick look at the FSM indicated to remove the stud that the diaphragm is attached to. This was just a small 8mm nut and lock washer that would give me problems later… Once the stud was removed it was simple to attach the diaphragm to the stud with washer and cotter key. Bending the cotter key around the stud was proof enough that removing the stud was in my best interest.
Install
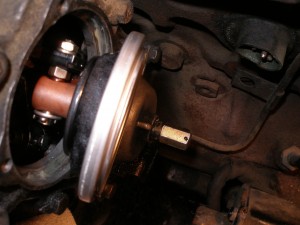
This is where things got fun. If you have ever taken a close look at the diaphragm housing you know that it is not in an easy place to get to. Which was still true for me even with the intake manifold removed. I cannot even imagine putting this thing in with the manifold in place. This just may explain why the key and washer were replaced by the simple piece of bent metal to hold it on. And I have to admit that the diaphragm probably couldn’t come off once the outer cover is in place but I wasn’t going to put it back half assed.
Once the diaphragm was ready the contortions began. While the assembly is easy to slip back into the hole in the rack, putting the washer and nut back on the stud is a challenge to say the least. After loosing the washer inside the housing for about 20 minutes I did manage to get it on the stud with the aid of a small magnet on a stick that lots of mechanics (including me have on hand). The nut proved a bit trickier as you not only have to get the nut into position, you also have to be able to spin it on the threads of the stud. All in a very limited access area and add on the fact you have to hold the stud in place so it doesn’t fall out while you try to thread on the nut…
The magic trick for the nut turned out to be a glob of grease applied to my finger to hold the nut while I moved it into place, a gentle turn with contorted fingers managed to get it partially threaded on so I could stop holding the stud. Took a try or two but it worked. Two 8mm wrenches snugged it up for good. While this  would be really simple on the bench, standing on a milk crate with the hood hinge digging into my gut and leaning over as far as I can just to see what I am doing in freezing weather is not so fun.
Remember that part about no oil or grease on the diaphragm? Guess what you are supposed to apply to the surface that the metal rim of the diaphragm sets into. Yup, grease. Makes a lot of sense doesn’t it, but you only need a small amount and it is only to help maintain the vacuum seal of the diaphragm assembly. No grease or oil is applied to the leather of the diaphragm.
Time to button it up and attach the vacuum lines. Just be sure the shims and spring are in the proper location as you fasten the screws. Now if you were crazy enough to try this with the intake and fuel lines in place, my hat is off to you. Especially if you didn’t swear in the process
Start Up
Since my rig was running OK before I didn’t expect any drastic results. But I did notice that some pulsations I had in the #1 and #2 injection lines are gone. Can’t say this is related but I was pleased to see it none the less. Yes it was a major pain in the neck but I am glad I changed it, just one more thing to not cause problems down the road.
And speaking of down the road, don’t forget to occasionally open that drain plug in the pump housing that will let out any excess oil that collects near the diaphragm housing. You don’t want to do this again any time soon.

