By Tony K
 This one tends to come up often as our rigs age and get more and more miles on them. Toyota has a specific way they want this replaced but it involves more money and tools than just a new seal.
Do many of us shortcut the process and change just the seal? Yes. But there are a few things you need to be cautious of. Toyota wants you to pull the pinion bearing and replace the crush sleeve, and reset the preload in the process. This is actually the correct way to do things and the way I recommend to fix things properly. But if this is not possible or practical there is another option. And this shortcut presumes the bearings are still in good shape, bad bearings and this is not an option.
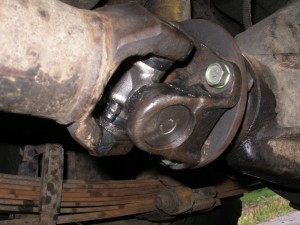
Obviously you first need to remove the driveshaft to access the nut on the flange. This is usually 30mm unless it has been changed somewhere along the line. Carefully unstake the nut with a thin chisel, this avoids damaging the threads and will allow you to reuse the nut.
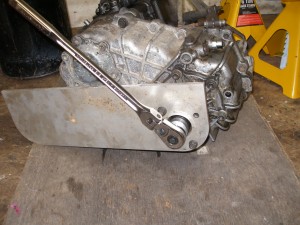
 Pulling the nut should be done carefully and this involves making a tool to hold the flange while you pull the nut. Do Not use the differential and axle to hold things while you remove the nut. All this tool has to be is a bar that bolts to the flange and uses the ground to stop the rotation of the flange. I made mine from aluminum plate drilled with the flange pattern and with a hole to access the nut on the flange. In the picture, its attached to my t-case but the same tool fits the diff flange.
Once the nut is off, pull the flange. Sometimes it will require some persuasion or even a puller but I have not had to use either.
A large screwdriver will usually get the old seal out, just don’t plan on it being any good when you are done.
Double check the fit of the new seal on your flange before you drive the seal into the diff housing. Just because you got the seal from the dealer doesn’t mean its correct. If it fits the flange and diff correctly you can drive it in. It actually sits about one mm into the housing if you noticed this when you pulled the old one.
Apply grease to the seal surface of the flange and the inside of the seal and insert the flange carefully so as not to damage the new seal. Replace the washer with a bit of sealant if you choose. This can help prevent oil from leaking past the splines. Re install the nut. Don’t torque it down to ridiculous pressure either, just tighten it back to the point that it was staked at previously. This somewhat ensures that you have the same load on the bearings, (not really but it gets you close). If you feel the need you could add just a touch more torque but you should check the preload with a torque meter, NOT a clicker torque wrench! Restake the nut, this is important if you don’t want to do this again.
Should you do things as layed out in the factory service manual? Yes, but this will get you by should the need arise.

