By Tony Konovaloff
![]() Ball hitches have some serious flaws when it comes to using them off road. They just don’t have enough room to articulate more than about 7 degrees in each direction. Pintle hitches, while easy to hook up with a proven history of strength and durability have their own problems. Primarily the noise going down the road. I just hate it when a hitch rattles no matter what kind it is.
Ball hitches have some serious flaws when it comes to using them off road. They just don’t have enough room to articulate more than about 7 degrees in each direction. Pintle hitches, while easy to hook up with a proven history of strength and durability have their own problems. Primarily the noise going down the road. I just hate it when a hitch rattles no matter what kind it is.
To remedy this I came up with my own. It is fully articulating, tough, easy to make, silent and Rubicon Tested (by none other than Eric, Lilly and mini-me).
If you look at a hitch in the most simple way, it has to turn left and right, move up and down to go over bumps and it has to twist if the rig and trailer are at different angles, which happens all the time off road. I took this simple idea and made a hitch.
My hitch is made up of some 1/2 in flat plate, two 3/4 in grade 8 bolts, a 2 in hitch ball and some square tube. You need a hitch ball with a fairly long threaded section.
![photo 2[1]](http://thewagonway.com/wp-content/uploads/2011/02/photo-21-225x300.jpg) I started by fitting a 2 in tube to a standard receiver, using a hitch pin to secure it. I added some weld beads ground down so that it wouldn’t rattle in the receiver. Then I added some steel to make the end sticking out a solid piece and drilled a hole horizontally. This creates the up down pivot axis. The front of the trailer gets some flat plate welded to the top and bottom of the tongue to create the left right pivot axis.
I started by fitting a 2 in tube to a standard receiver, using a hitch pin to secure it. I added some weld beads ground down so that it wouldn’t rattle in the receiver. Then I added some steel to make the end sticking out a solid piece and drilled a hole horizontally. This creates the up down pivot axis. The front of the trailer gets some flat plate welded to the top and bottom of the tongue to create the left right pivot axis.
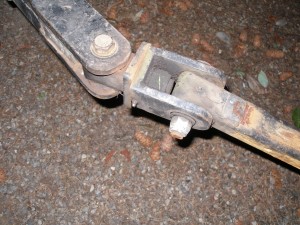
Now to connect the two. Fit the hitch ball into a short section of 2 in square tube with the threaded section sticking out. You have to grind the ball into a square shape. This part goes into the space in the tongue and gets a hole drilled through it. Prior to bolting it in, drill two pieces of 3×3 x 1/2″ plate with holes that will fit over the threaded section of the hitch ball. One of these is welded to the square tube you all ready fitted over the ball. This 3×3 section of plate forms the bearing surface of the roll axis.
Fit another section of plate to the threaded section but this time it is not welded to the ball assembly. You add two pieces of![photo 3[1]](http://thewagonway.com/wp-content/uploads/2011/02/photo-31-300x225.jpg) plate to it to form a U shaped section. This U shaped piece is bolted to the ball assembly with a nylock nut and you now have a roll axis. You can’t use the lock washer that came with the hitch ball because it would prevent the assembly from rolling or it would come loose as the trailer moved on this axis. The other end of this U is bolted to the tube you fitted to the hitch receiver.
plate to it to form a U shaped section. This U shaped piece is bolted to the ball assembly with a nylock nut and you now have a roll axis. You can’t use the lock washer that came with the hitch ball because it would prevent the assembly from rolling or it would come loose as the trailer moved on this axis. The other end of this U is bolted to the tube you fitted to the hitch receiver.
And just to make sure everything keeps moving as planned, I took everything back apart to drill and tap all the pivots for grease fittings.
You now have a fully articulating hitch. To remove it just pull the hitch pin from your receiver and push the trailer back. While it is a little more inconvenient to hook up than other hitch designs. It is secure and silent.
Short of a confusing drawing the pictures should clarify everything. All told I don’t think there is more than $30 dollars into this hitch design. And now that I have  a small mill I do have plans to make a more compact version of my hitch….
![photo 5[1]](http://thewagonway.com/wp-content/uploads/2011/02/photo-51-300x225.jpg)

