By Tony Konovaloff
When I put the H55 into my diesel wagon I found out that I could not use my early t-case, the bearing configuration was completely different nor did it have the provision for the 5thgear oiler cup. I had to use a newer t-case. Luckily for me Eric had recently swapped out the auto in his 62 for a manual tranny set up so we 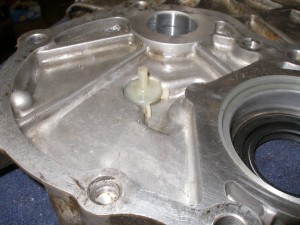 had an extra t-case laying in the yard. And lo and behold the t-case for the auto had the oiler cup provision so I was good on that account as well.
-Vacuum to Manual Control-
But having the right t-case was not the only dilemma I ran into. The t-case off the A-440 auto tranny was vacuum controlled, something I have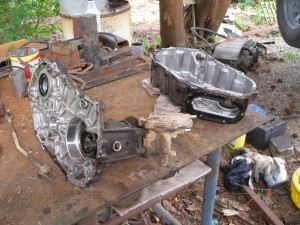 never liked even on my own 62. But after some eyeball engineering and some research I found that I could just swap some parts out of my early case and convert the newer t-case over to full manual control. And you will see there is no way to do this properly without opening up the t-case and changing some internal parts.
-Needed Parts-
Surprisingly there are very few parts needed to make this swap. The parts (either new or from an older manual controlled tcase, year of the donor is not important) you will need are:
4WD shift rod and fork (the in/out shift rod),
Hi/low range selector lever (including the arm that bolts onto it on the outside)
one detent assembly (plug, spring and ball)
Boot and seal for the front of the 4WD shift rod as this is where the old vacuum diaphragm was connected
T-case shift levers from a manual set up (year is not critical)
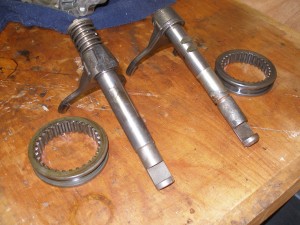 In the picture the shift rod with the spring is from the vacuum controlled tcase and the one with the notches for the detent comes from a manual tcase. The round shift collar is the same in both so use the one in the best shape. And it doesn’t matter which year the parts come from as long as they are from a manual tcase.
You will also need one of the detent plugs, spring and ball from the older t-case as there is no detent for the in/out shift rod on the vacuum controlled case. The detent is important as it is the only thing keeping the shifter locked in position.
Some plugs are needed for the electric sensors that I won’t be using. The only parts I bought new were the boot for the shift rod, the seal for the same and a new seal for the high low shift lever on the top of the case.
-Tear Down-
Remove the diaphragm assembly by first pulling the little side cover, remove the lever and now you can pull the four bolts that hold the housing on. Set the whole mess aside as you no longer need this contraption.
Time to split open both cases. Hopefully you are doing this on a workbench as lots of the parts want to fall out, sometimes suddenly. While you might at first think you can mix and match other parts, you can’t. The idler shaft is a different size and all of the internal gears are different and this includes the main transfer gear.
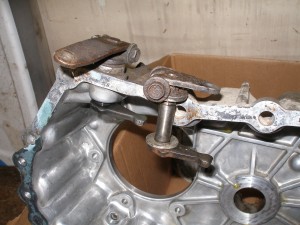 Remove the hi/low shift lever. In this picture you can see why you need the hi/low shifter arm. They are oriented completely differently and the arm on the top for the manual control version is almost twice as long. This is because of how each tcase is shifted between hi and low range. The shifter on a vacuum controlled tcase only has to move fore and aft. On a manual tcase the lever actually does several things, fore and aft shifts you in and out of 4WD while a side to side motion determines hi or low gear.
The lever installed in the case (in the picture) is for the manual shift levers and the one hanging on the front is from the 62 tcase. And due to machine work on the shaft you can’t just switch the outside components. The notch that aligns this lever points in different directions. Just for reference the levers are oriented in the direction they face when in Neutral.
After pulling the linkage off the outside it just slips into the case. Rust on the shaft may need to be removed to get it through the seal and ensure you don’t scar up the case when you reinstall it. Now pull these same parts from the newer case and pull all the sensor wires from the new case as well. At this point I soaked and cleaned the new t-case.
-Modifying the Case-
Save one of the detent assemblies (bolt, spring and ball) from the early t-case. On the newer case you will need to drill and tap a hole for a detent for the in out shift rod. Strictly speaking, this is the only actual modification you have to make, everything else is just swapping out parts.
You will notice there is already a dimple in the case where this hole will be located. A vacuum controlled t-case just didn’t have a use for the detent so it was never installed. While drilling and tapping this hole I inserted a piece of flat bar in the machined hole for the shift rod 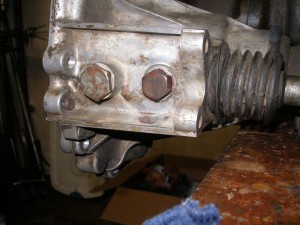 so it would not be damaged if the bit jumped. As is often the case when drilling aluminum with a large drill bit and hand drill. The tap you want to use is actually an M15 with a pitch of 1.50. Not very common to the local hardware store here in the US. Surprisingly it is extremely close to a 5/8ths-18 NF thread which is what I used. Used a bit of thread locker when I installed it and it hasn’t leaked or come loose in a year. The installed detent is the small bolt head in the picture.
You can now plug all the unused sensor holes. Surprisingly axle drain plugs fit two of the holes. You can see one of them in the pic at the left, its the larger of the two hex fittings. For the other one I just cut off the sensor wires and reinstalled it to plug the hole. Yours may be a bit different with one less hole to plug, my early (1982) does not have a FWD indicator so the hole on the forward part of your t-case may get used if you have the indicator light in your rig.
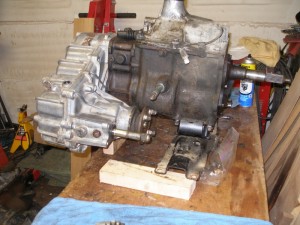 No need to plug the holes that held the diaphragm on as those holes do not penetrate into the t-case. (I did happen to notice that my early t-case actually had the provisions in the casting for the bolts of the diaphragm assembly)
-Re-assembly-
Time to start the reassembly now that the only mods you need to do are done. Being that this ariticle is about swapping over to manual control of your t-case and not about rebuilding the case, I am going to stop rambling on and return you to your Factory Service Manual to finish things up. Take your time and carefully follow the directions in your FSM for reassembly. It would be good (but not necessary) to have the manual for both t-cases as you are using parts of both.
While mine was apart I went ahead and replaced the front output bearing and seal. This needs to be done with the front half of the split case removed from the tranny as you need to put the parts in a press . All other maintenance to the t-case can be done with the front half still 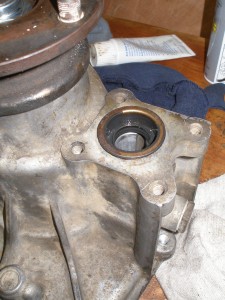 attached to the tranny. Once this is done install the shift rod seal on the front of the case. Its sort of a goofy seal as it is not all the way pressed in and the exposed lip is what holds the dust boot on.
There is nothing unusual at this point, just getting everything back in and tightened down properly. About the only thing I found to be a bit tricky was getting the hi/low shifter into the proper place as you slide the case back together but even this is not difficult. And don’t forget to make sure everything functions properly before you put the tranny and t-case back in the rig. Take your time, carefully follow your FSM and it will all go back together using the parts from the manual t-case. And that’s all you need to do. Hook up the linkage and you are good to go.
If you are converting a tcase that is still attached to an auto you will have to do some linkage fabrication. Mostly due to the fact that the pivot for the tcase shifter is about an inch farther forward than most of the manual tranny’s. I have only done this change when installing the t-case on a manual tranny. I would think that adapting the levers from a manual tranny would not be overly difficult and I do believe there may be a good chance that stock levers just may bolt onto an auto with only minimum fabrication.

