By Tony K
I have now entered a whole new world. The land of the ham radio operator, well almost as I still have to get my license so I can pull the transmit button. Lucky for me I have a neighbor who is really into amateur radio so I have someone to pester with questions.
Like Eric I also went with a Yaesu radio but I went with a less complex model that is only a single band radio after talking with another friend down in Oregon. He said most of the traffic is on the 144mhz band and having people to call in an emergency tops the list of reasons for me having this thing in the first place. Besides that I am not near as savy as Eric is with electronics so I figured the simpler the better.
 –Yaesu FT2900R-
There is almost too much to learn about this thing and it is packed with more features than I will ever use. Just who needs memory space for 1800 channels… I just want someone on the other end to hear me. I settled on this model as it seemed to be much simpler than the dual band models and it also had more power than was typical of many of the other options, 75watts versus 50.
One feature that I do find nice to have is the access to the NOAA weather channels. I used to have a CB with this but I had changed it out and it is nice to once again know what the weather guessers are thinking.
-Ham (2M/70cm) vs CB-
I still have a CB in my rig and I have no intention of removing it. It is great on trail runs to communicate with other guys as more people have CB’s than a 2M. Just why a ham radio is called a 2M is currently beyond me but I am learning as I go and there is a lot to learn.
The main advantage for me with a 2M is the range. CB’s are limited to only 4 watts per channel while the basic license for a Ham license allows you to run up to a 100 watts per channel if I read correctly. What this translates to is a far greater range than a CB. One day I was listening to a couple of guys in Canada and they were more than 60 miles away from me. Whether I could talk to them is another story as I didn’t try and I do believe you can sometimes receive at greater distances than you can transmit.
Repeaters are another great aspect of using a 2m radio. CB’s can only talk to each other directly while the 2m can connect through a repeater and the sky is the limit, or something like that anyway. Still not sure how they work but they drastically increase how far you can talk. And to find all those repeaters out there try this link as it pretty much lists repeaters all over the world, www.K5ehx.net.
There is also a far greater selection when it comes to available channels, no longer are you stuck with just 40.
 –Type of Antenna-
Just like the radios there are a gazillion different antennas out there. And trying to get a simple answer about the best one for my rig is not easy. I have heard that the guys in the Ham Radio Outlet stores are a real help but sadly the retail store is 5 hours from me. (But I still bought my radio from them on the internet).
What I have learned is that the vehicle is involved in the equation and the height of the antenna is also a factor. Safety comes into play as well due to the fact the antenna puts out some type of radiation in the form of radio waves. The manual for my radio had some good advice and said the antenna should be centered on the roof as far away from passengers as possible.
You also need to make sure your antenna is rated for the power output of your radio. If not you can actually burn up the antenna from too much output power. I am still trying to find out just where the radio waves leave the antenna, whether it’s the tip or the whole thing. It also needs to be rated for the style of radio you have, single, dual, tri or quad band.
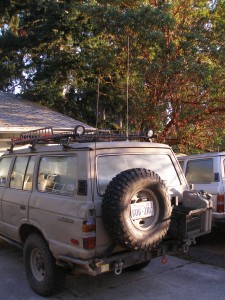
I decided to keep things simple as usual and went with a simple wire whip that is 52″ long. Figured this would not get too much in the way and not likely to smack someone on the trail.
 –Antenna Mounts-
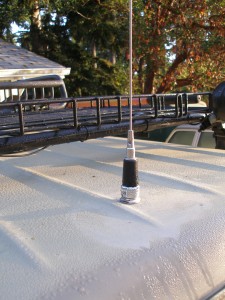
You not only have the confusion of just where to mount your antenna, you also have options as to what you mount it with. There are two main types, a UHF style and the NMO style, (also known as New Motorola). While the mounts do the same thing they are not interchangeable. If you have a UHF base you need a UHF style antenna.
I went with a UHF style base. Time will tell if this was the best choice.
As for where I put it, a step drill provided the answer. I run a roof rack so centered on my roof was not an option but the back of the roof is clear and convenient. And you probably know by now that I am not bashful about cutting into my rig so one large hole and some sealant and I was good to go. The added advantage of mounting it this way is that the coax that connects it to the radio is completely contained inside the rig. While you may cringe at the thought of drilling a hole in your roof many other no drill options are available as well as alternative locations to mount the antenna.
-Mounting Your Radio-
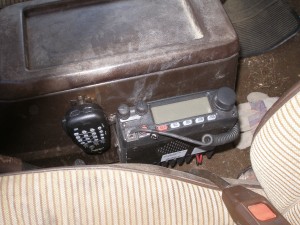
I never thought that I could get even more electrical stuff in my console but that is exactly what I ended up doing. I didn’t want to put this thing on top of my dash and there was no convenient space on the bottom of the dash so the console was my only option. And in the end this was probably for the best. If you have read the console write up here on the site, you know that I have power readily available at this location as well as a good ground. Both very needed items for the install.
The latest trend in electronics these days is that not only is the power supply fused but so is the ground. Generally this is for surge protection so your gear doesn’t get damaged.
So far the only concerns I have with where it is mounted is the fact that my four legged companion can step on the face of the radio if she is not careful. So I either have to make a shield to protect things or maybe even lower it a bit to get it more out of harms way.
-Helpful Stuff-
Get ahold of your local ham radio club. The guys in it know a whole lot more than I do and they can point you in the right direction as well as tell you how to get your license.

