By Tony Konovaloff
![]() I have to admit I was pretty impressed with just how well Eric’s Ready Welder worked while he built Mini Me and it was great having his Ready Welder along on runs but with him off “vacationing” in sunny Florida, I had to do something else. Fortunately Xmas came and my own Ready Welder arrived courtesy of my spouse. Gotta love a woman who will buy you a Mig welder. I really like the way the Ready Welder system is set up and I like that I can use flux core wire that doesn’t require the use of gas to weld. And it doesn’t rely on my alternator either which was only designed to charge batteries in my diesel. I think it’s a really good addition to my tool kit and it more than proved it’s worth on our Rubicon run last August. The peace of mind it provides on long trips is invaluable.
I have to admit I was pretty impressed with just how well Eric’s Ready Welder worked while he built Mini Me and it was great having his Ready Welder along on runs but with him off “vacationing” in sunny Florida, I had to do something else. Fortunately Xmas came and my own Ready Welder arrived courtesy of my spouse. Gotta love a woman who will buy you a Mig welder. I really like the way the Ready Welder system is set up and I like that I can use flux core wire that doesn’t require the use of gas to weld. And it doesn’t rely on my alternator either which was only designed to charge batteries in my diesel. I think it’s a really good addition to my tool kit and it more than proved it’s worth on our Rubicon run last August. The peace of mind it provides on long trips is invaluable.
-Hooking it Up-
Do bear with me while you read this as it is one of those topics that is far easier to actually do than to write about. Consider how hard it would be to write down how to tie your shoes….. versus just tying them. Once I opened the hood it was about 5 hours to make the switch mounts, install them, make up some new battery cables and connect all the wires (Didn’t help that it was only 30 degrees out while I did it). The first time I pulled the trigger on the welder itself I was like a kid in a candy store, that is so cool to weld with only the batteries.
Let me start by saying that I like things simple, I want them to be bombproof if possible and I like it when they are quick and easy to operate. The main thing I didn’t like with the recommended way of hooking it up was that it was none of these things. Having to disconnect then re-connect everything just to weld seemed to me to be a big pain in the arse. I want to be able to just plug it in and start burning metal. I know it’s a little more complicated than that, being a 12V vehicle and a 24V welder, but when I sat down and applied a little common sense I managed to come up with a way to do it using only battery switches. No need for tools. About the only time you would need to use tools is to reverse the polarity when using a non flux cored wire which isn’t likely on the trail as you would need to carry an Argon or CO2 bottle which I don’t intend to do. This way of wiring also isolates the batteries from the vehicles electrical system which Ready Welder does recommend while welding. 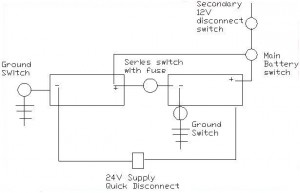
The only weak point in this system is the operator, flip the switches in the wrong order and you may fry something. But this can be overcome even with my limited brain power! And with a little more thinking I have mostly eliminated the chance of frying something. And remember even if you use the disconnect/re-connect wires method to hook things up, you can still make the wrong connection and mess something up.
And lest you think I am crazy by hooking things up this way, I checked with one of the electricians at work and yes they do make a fancy solenoid that does pretty much (but not all) the same things my switches do but, there is one major drawback, they cost a couple of hundred dollars. My system if you want to call it that was around a hundred dollars to put together. While the schematic may not use the exact symbols I think it pretty much clarifies what I have written.
-Converting 12V to 24V-
The tricky part is not switching two batteries that are hooked up in parallel and converting them over to 24V by placing them in series, rather the tricky part is making the change with switches while at the same time isolating the batteries from the 12V electrical system in the rig. Isolating the power from the batteries is the easy part, I just use my existing Blue Seas main battery switch to turn the power off. But it also takes four additional heavy duty battery switches, I used Hella switches, part #6EK 002 843-011, and a Blue Seas Terminal Fuse Block part #5191 and a Marine Rated Terminal Fuse (200A) part#5187 to complete the system.
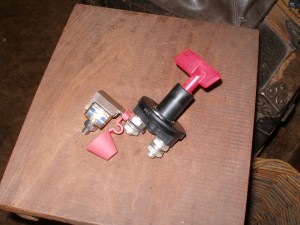 The picture of the switch includes the fuse and holder, only the series switch gets the fuse.
The grounds of the batteries each get a switch to disconnect them from the chassis. Another switch goes in the ‘series’ cable between the batteries along with the fuse and holder. The Quick Disconnect to power the welder is connected just like the manual says. Negative to the positive terminal of the passenger side battery and Positive to the negative terminal the drivers side battery. This will give you DC+ for welding with flux core wire. If there is ever a need to reverse the polarity, DC-, I just have to swap these ends. The fourth switch is not necessary but rather it is put in the 12V supply line as a safeguard to prevent actuating the series switch (24V) with the 12V supply still turned on. Which would be a bad thing.
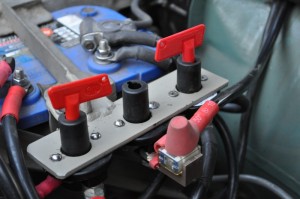 -Using the System-
When the rig is running in a normal 12V operating mode the main battery switch and the secondary 12V supply disconnect are both ‘on’ and the two ground switches are ‘On’. The Series switch is ‘Off’. There is no need to remove the wires for the Quick Disconnect from the batteries as the plug keeps the wires apart. I had hoped to use the plug for a 12V source when not switched for welding but most of the time I have the welder set up for straight polarity (DC+) welding which is backwards from a 12V power source (DC-). So I guess it’s a good thing that it uses a different plug than I have for my jumper cables.
For welding, the main battery switch is turned to ‘Off’. The swtiches on the ground cables are set to ‘Off” which disconnects the grounds and this isolates the batteries from the vehicle electrical system. Now is where the 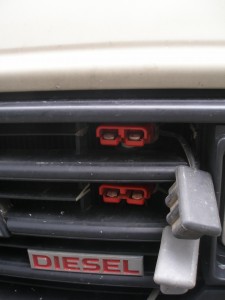 secondary 12V disconnect switch comes in. Since the battery switches I am using are a keyed switch I use only one key for both the 12V disconnect and the series control switch. To even turn on the 24V supply, you have to remove the key from the 12V disconnect switch (which turns it off) and use it to turn the series switch on. This makes it virtually impossible to actuate one without shutting off the other. The switch in the series cable is now set to ‘On’ which changes the wiring to a ‘series’ layout creating 24volts for the welder. And without changing any wires the Quick Disconnect/welder power supply is now 24V. And no I didn’t forget about the fuse, it’s whole purpose is to protect the rig and wiring from operator error. Should I forget to switch off the grounds before actuating the series switch, the fuse will blow preventing damage and reminding me that I can still be an idiot. And there was one safety feature that I managed to include by accident, by locating the switches so close together when I turn the series cable on, it actually flips one of the ground switches to off.
Plug in the welder and you can start burning metal. And in case you are wondering about the two plugs in the picture, the plugs are not compatible. The top plug is 12V for jumpstarting and the bottom one is the 24V supply for the welder. Covers 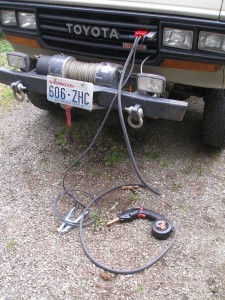 are even a different color, black for 12V and grey for the 24V. While the plugs look very similar it’s not possible to switch them by mistake.
When you are done just reverse the order that you turn the switches. First turn the series switch to Off then use that key to connect the secondary 12V disconnect, Ground switches to On, Main Battery to Both and you are once again back to a 12V system. Just why two 12V battery swithches? Like I said earlier the secondary switch is a safeguard to prevent damage to my wiring system while the Main switch is used more for maintenance and to isolate the batteries if I need to for winching or jumpstarting another rig.
Simple. Easy and quick to operate. Almost bombproof.

