By Tony Konovaloff
As anyone who has done it knows, a Birfield replacement is a big greasy mess. But add in the thrill of doing it on the side of the trail and the fun is multiplied exponentially. And now you get to know just what I had to go through after blowing a birf apart on the way up Cadillac Hill on the last day of our Rubicon trip.![]()
Fortunately there was a short, relatively flat bypass right next to where I broke so I had a nice spot to do the work. My fellow wagon driver Eric Burch even marked the spot for posterity on his GPS. (If you are really curious, it was just shy of Observation Point at N39 02.041 W120 15.090, elevation was 6630ft) Doing this while blocking a popular trail would not be fun. About the only way to have more fun would be to do it in the rain.
While you hear all sorts of stories about how fast you can do this, from start to finish this job took me from jacking up the rig to pulling back on the trail, just under two hours. And that is with a bunch of cruiser heads in attendance and I am very familiar with tearing down the front end of my rig. While some people are way faster this will probably be a realistic time frame for the typical trailside repair. It had been a long day and we were still miles from the trailhead. I had already changed a front brake line that I managed to tear off and my rig was already limping. Several hours earlier I had snapped one of the axles in my full float rear end so I was going to do this right.
If you have never done this before it will probably take longer. If you haven’t done this in your driveway, I would suggest doing so at the first opportunity. Good practice and you can change those leaky wiper seals while you have things torn apart. Far less scary in your front yard than on the trail. And no, you can’t just unlock your hubs and fix things later. Turning the knuckle moves things around and you can still possibly tear up an inner axle even in 2WD. I know it happens as we destroyed an inner axle on my buddy’s wagon when we delayed fixing his birf and drove out in 2WD on an earlier trip we had taken. And before we pulled out all the broken pieces his rig would not turn to the right, which we did find somewhat funny at the time.
Some important things to have
There are some things that will make your life much easier when its your turn to make such a repair. Newspaper, paper towels, garbage bag, small plastic bags. Gloves, I use blue Nitrile ones. Tools to have include a torque wrench but more importantly 10, 12, and 14mm 3/8 drive sockets and a 17mm ½ drive socket for the caliper. Ratchets and extensions go without saying but a speed handle has earned a place in my tool kit as well. A hub wheel nut socket is pretty important as well. And a pair of snap ring pliers beats the heck out of the twisted screwdriver technique to remove the c-clip. A rubber mallet, hammer and screwdriver for the star washer should pretty much be all the tools need. You will be surprised just how few of your tools you actually use during a birf change.
Torque specs for all bolts are important. If you are really prepared you could use a cheat sheet, but I tend to pack a Factory Service Manual for reference. Several other things will come in handy as well, a suitable Jack (I just used my Hi-lift) long flexible brake lines, magnet on a stick, the all important pre-greased Birfield with c-clips (now I carry one attached to an inner axle) and lastly a 1 pound can of grease.
The Dreaded Fix
Once you hear (or in my case feel) that horrible grinding or hear the classic pop it’s time to jack up the rig. This also allows you to confirm your fears. Block the wheels to keep the rig from rolling and jack up the offending corner. With the hubs still locked, locker still engaged and the t-case still in 4Lo, spinning the wheel confirmed that the front left birf was toast. For good reason, don’t raise the rig any more than necessary to remove the tire. Once you pull off the wheel slide it under the axle and it will serve as an emergency jackstand in case the rig tips off the jack.
Start by pulling the free wheel hub and drop it and all the bolts and washers into plastic bags. By putting everything into plastic bags you keep out the dirt and it saves you from re-greasing some of the parts, including wheel bearings. Having lots of bags allows you to keep things organized as well.
The next thing that needs to go is the caliper and this is where long brake lines are a godsend. If you have traded out the hard lines for flexible ones you won’t have to re-bleed the brakes, you can just unbolt the caliper and lay it on to the spring pack.
Once you get to the wheel hub, due to its size and weight it’s easier to just place it on a sheet of newspaper. But do make sure to place it where you won’t kick a bunch of dirt into it. Do the same with the spindle but place the bolts in a bag to keep from losing them as well as keep them clean.
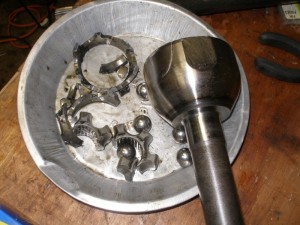
Now you get to pull the offending birf out of the housing, don’t forget that you have to roll it around to get the flats to line up to remove it. A quick look at the birf showed a nice big crack in the bell. More than likely this crack in the bell is what led to failure of the birf.
Hopefully, the carnage doesn’t tear up the inner axle. I got mine out before it ate the axle. Some parts of the birf were even still attached to the axle. Pull the inner axle. After removing all the pieces from the axle and seeing that it was OK, it was now time to get messy. With the paper towels and your hands, remove all the grease from the knuckle. Don’t try and leave it in place. If you have my experience, it will be full of small sharp broken parts that need to come out. These are the remains of the cage that held the balls of the birf. Clean out as much as you possibly can, then run the magnet around the inside of the knuckle to pick up any small parts you may have missed. Count the balls to make sure you found all six and if possible, roughly put the broken parts back together to make sure you get all the pieces. My magnet did find some pieces I missed. All the greasy paper towels go in the garbage bag. Don’t hesitate to change gloves as you go along. Once everything is cleaned up you may as well change the birf seal, you may avoid pulling things apart later if you change it now. I didn’t and had to pull things apart at home. The broken birf allowed the inner axle to move around enough to destroy the inner seal but fortunately, it was time for a brake job anyway.
This is why I now carry a birf already attached to an inner axle. It was a three person, zip tie and a hammer on a rock affair to get this thing back together. One guy holding the birf, me aligning the two parts, zip tie compressing the inner c-clip (the one on the end of the inner axle that ends up inside the birf) and a third guy smacking it together with the mallet. Remember you are not doing this on a nice clean bench but using whatever rocks are handy for your workspace. Pre-assembly of a complete spare axle avoids all this, saving time and aggravation.
Once the axle is assembled, you can put it back in but not before you pack the knuckle full of grease. And yes, you will use that whole 1 lb can of grease (or should). Put everything back in the order it came out, spindle, backing plate, wheel hub and finally the caliper. All that newspaper goes in the garbage bag. Torqueing all the bolts as you go. Lucky for me I was able to save all the paper gaskets. One other hint before you put that external c-clip back on, keep a small 8mm bolt handy to thread into the end of the birfield. This way you can hold the axle in place while the c-clip drops into the groove at the same time. Don’t know how many times I fought this one before I figured that threaded hole had a purpose. Lastly, re-install the freewheel hub, put the wheel back on (torque the lug nuts) and you are good to go.
Lessons Learned
Take your time and make sure you get everything assembled correctly. It had been a long day and we were tired. Work neat and clean, especially when re-installing everything. I went slowly and methodically to make sure I didn’t have to do things twice. Patience and humor goes a long way. Don’t get frustrated.
The only thing that really bummed me out about this whole experience was the fact I was holding up everyone else. When you break on the trail, it’s not just you. There is usually a group with you that are also stuck while you fix your rig. Lucky for me, I had a great supporting cast. All of the guys helped out in one way or another with the repair while my wife took pictures. We also had kids with us as that needed to be occupied and the older ones did a great job of keeping the younger ones busy. Some of the group played tourist for awhile. Even had some fellow wheelers check to make sure we had water and didn’t need anything before going on their way. So even if you aren’t directly involved in the repair there are things you can do to help that poor slob hunkered over a broken birf.
In the end everyone took it in stride as they know the next time it could be them.

