By Tony K
There were two types of axles available on the 60 series, semi float here in the US and Canada and full floats in Australia and other parts of the world. While they do the same thing, mechanically they are very different.
-Semi-float-
On this type of axle and housing the driven axle shaft supports the weight of the rig on a single bearing and provides the motion to make your rig move. The shaft is held into the housing by a c-clip inside the third member. That’s the main drawback to this design. The axle is doing double duty and if it gets too stessed and breaks there is nothing to hold the wheel onto the rig. But this doesn’t mean this is a common occurance, thousands of Land Cruisers have driven through Rubicon and other trails with no breakage. Toyota’s design is plenty stout for it’s intended use.
 -Full float-
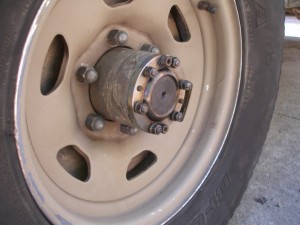
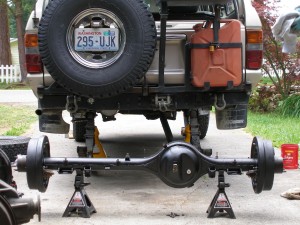
Large trucks always use full float axles. A full float has a far greater capacity to carry loads. In an Austrailian brochure I saw Toyota lists the weight limit for their full float at 2500 Kilograms (about 5500lbs) which is far greater than a semi float. The weight is supported by two wheel bearings on a spindle that is part of the axle housing. Very similar to your front axle but in this instance it doesn’t pivot for turning. The axle shaft itself only provides the rotation needed to move your rig. The axle is attached to the wheel hub by studs, cone washers and nuts that are identical to the ones on your front hubs.
On Toyota full floats many of the parts are common to your front axles. They use the same hub studs, wheel bearings, as well as the flange gaskets. This allows me to carry fewer spares. In addition, the brake drums and backing plates are the same ones that are fitted to a semi float axle.
I have heard there is a minor difference in the carrier of the third member but essentially the thirds are interchangeable between the two axle housings. A front third member will bolt right into a full float housing with no changes whatsoever. The rear third needs to have a spacer on the pinion shaft removed but this is simple to do and no major disassembly is required. If fact you have to remove this spacer just to get the semi float axles out of the housing.
 For me the true benefit of a full float is the simple fact if the axle breaks the wheel will not fall off. If you have an extra axle (as I do now) all you have to do is swap it out for the broken pieces and keep moving. You don’t even need to jack up the rig. If you don’t have an extra axle at least all four wheels are still attached and hopefully you can drive out with the front axle.
-Maintenance and Upgrades-
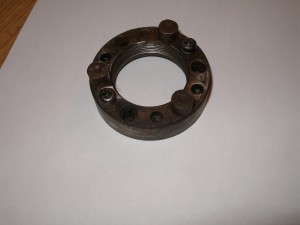
The bearings on the full float housing are the exact same ones as used on the front hubs. So you set the pre-load on the bearings the same way. The one oddity is that the rear axle uses a goofy nut and lock plate to hold the bearings and hub on rather than the two nuts and star washer of the front hubs. As you can see in the picture it is nothing like a regular nut. To tighten this thing down I bought and modified a large socket from the auto parts store. Not sure what it was made for but it had a shape close to this nut and was easy to modify. Probably easier to get than the factory tool anyway.
 The one big change (besides my air locker) I made to my full float was to upgrade the axles to Chromoly ones from Polyperformance. I don’t want to break another axle.
Something else you may find helpful is to put two short bolts in the threaded holes of the flanges of the axles. This will keep dirt and gunk out of the threads because someday you will need to use these two holes with longer bolts to push out the axles. Another good idea is to use anti seize on the cone washers so they don’t seize up with rust. Which just makes them a pain to remove.
Lastly when it does come time to remove an axle, put the longer bolts in with some tension on the axle flange, make sure the nuts are all loose on the studs and lightly tap the flange. The cone washers will sometimes pop loose and want to fly off, this is why you just loosen the nuts and not completely remove them.
![]() The one other thing I do when I put the axles back in is to not use any sealant on the gaskets. I have done it this way for a couple of years now and have not had any leaks. Do this on the front hubs and the third member gaskets as well. Makes it handy for the next service, none of the parts stick in place as there is no sticky stuff holding the gaskets in place.
The one other thing I do when I put the axles back in is to not use any sealant on the gaskets. I have done it this way for a couple of years now and have not had any leaks. Do this on the front hubs and the third member gaskets as well. Makes it handy for the next service, none of the parts stick in place as there is no sticky stuff holding the gaskets in place.
-Availability-
While the Australians got the full float standard we have to go to further lengths to get them. Thanks to some of our great suppliers they can be had. All you need to buy is the full float housing with the axles and hubs (the hubs are slightly different from the front axle). And all your other parts will work, including your brakes. They use the same backing plates, drums, etc.

