By Tony K
It happens to all of us. Sometimes it’s not directly our fault but we have to fix them none the less. But don’t panic, even on the trail, as the fix is not that far away.
 First and foremost you have to get the remains of the fastener out of the hole. The easiest way to do this is with a screw/bolt extractor. While there are several types of these available I have a preference for the square style. I have had the best luck with this type. They are tougher than heck, I have even seen them twist as the bolt comes out. Other extractors might break in the same situation.
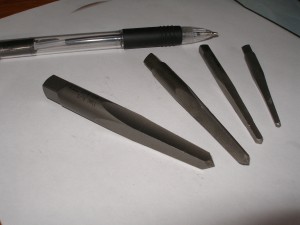
The extractors I use are not very expensive and are sold by my local Ace hardware store. They are made by Irwin and run less than $5 each or a set of 5 runs less than $20. As you can see they have a square shank that fits in a tap handle, but they work just fine with a cresent wrench or even vise grips. The first time you pick one up you will notice the corners are fairly sharp. And once they lose this edge it’s time to replace them.
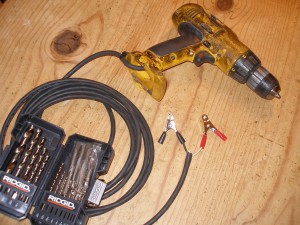
The other part of this equation is a set of drill bits and the means to use them whether you are in the garage or on the trail. I bought a small set of Cobalt bits (1/16 to 1/2). These bits are super tough but should be used with caution as they are extremely hard. Thats why they hold an edge and will keep on drilling in tough metals such as the stuff bolts and studs are made of. But careless use will break them.
Start things off by drilling an appropriate sized pilot hole for the extractor you are going to use. The larger ones have a drill size listed on them but the smaller ones may take some educated guessing on your part. If in doubt start out with too small of a drill bit, you can always enlarge the hole. And try to keep the bit centered as much as possible. A center punch may help or even drill a small pilot hole.
Nothing tells you how deep to drill, it just takes some trial and error. Too shallow and the extractor will just spin out. Deeper is always better as long as you don’t damage anything below the broken piece. Ideally you want a hole that allows the extractor to bite into the sides of the broken fastener but not hit the bottom of the hole. You should be able to tell if the hole is too shallow when you tap in the extractor, it has a different feel than an extractor that is biting solidly into the sides.
After tapping in the extractor firmly without getting overly carried away with the hammer, spin it out with the handle of choice. Go easy as too much force can spin the extractor in the hole. But the taper of the extractor does help prevent this. There is a fair amount of finesse involved when ever you are removing broken fasteners.
While you may think these are only for larger bolts, that just isn’t true. Recently I used the smallest one in that picture to remove some stripped out #10 stainless screws in a boat deck. The screws had to come out and collateral damage was not an option so out came the extractors and it worked just fine.
Should you get a little carried away, it’s also a good idea to carry the most common taps that you may need to re-tap a hole. I carry an 8mm 1.25 and a 10mm 1.50 tap as these are the ones for the hub studs and the knuckle studs. Off center drilling in a bolt can also frequently be saved by re-tapping the threads. And cleaning out threads before re-installing new studs or a bolt is never a bad idea.
 So how do you drill things out on the trail? My solution was already in my shop. I had an old 12V cordless drill that worked out great as a trail tool once I added a cord so that it would run off my engine batteries. No way you will ever run those batteries down with this drill either.

